Search this blog

Monday, May 12, 2008

50 Windows Tips & Tricks-2

10 Add Run to Start menu (Vista)
After moving from Windows XP to Vista, some people miss the Run option from Windows XP’s Start menu. To add a Run link in Vista right-click on Start, select Properties and move to the Start Menu tab before clicking Customize. Scroll down through the options, tick the box labelled ‘Run command’ and click OK.

11 Make it easier to select files (Vista)
To make it easier to select a number of files or folders, it is possible to add a tick-box feature to all icons. Open a folder and click Organize, then on ‘Folder and Search Options’. Move to the View tab, tick the box labelled ‘Use check boxes to select item’ and click OK.

12 Restore the Show Desktop icon (XP)
The Show Desktop icon in Windows XP’s Quick Launch toolbar is very handy, but it’s also easy to delete. Getting it back is rather convoluted, but Microsoft has provided a guide – scroll down the page and click Download Guided Help. Opt to Run the file, and follow its instructions. For a quicker way to show the desktop, press the Windows key and the M key together.

13 Extend Send To (Vista)
We’ve explained how to add items to the Send To menu in Windows XP numerous times, but the process is a little different in Windows Vista. Open the Control Panel, then Folder Options, then move to the View tab and select the option labelled ‘Show hidden files and folders’ before clicking OK. Now click Start, Computer, and open the C drive.

Open the folder called users, then the one with your user name, then the folders AppData, Roaming, Microsoft, Windows and SendTo. Add any shortcuts you want in the Send To menu to this folder.

14 Hide Recent Documents from Start menu (XP)
The Windows Start menu normally shows which files have been opened most recently. This can be handy, but it’s possible to remove this feature. To do so, right-click the Start button, select Properties and move to the Advanced tab. At the bottom of the dialogue box, untick the option labelled ‘List my most recently opened documents’ and click OK.

15 Quick Launch keyboard shortcuts (Vista)
The Quick Launch bar makes it very easy to start the most frequently used programs. As well as clicking the shortcuts, though, it’s possible to start the programs in Quick Launch using the keyboard. Press the Windows key, then the number key relating to the position of the icon you want – for example, to start the program that’s second from the left in the Quick Launch bar, press the Windows key and 2 together.

16 Access shared folders simply (XP)
It’s possible to make it easier to find shared files on a computer attached to a network. Right-click the My Computer icon in the Start menu, select Map Network Drive then choose a drive letter from the dropdown menu. Click Browse, then navigate to the shared folder and then click Finish. It’ll now be easy to find that shared folder by simply opening My Computer.

17 Permanently show menus (Vista)
When viewing folders in Vista the menu bar is hidden. It can be temporarily restored by pressing the Alt key, but it’s also possible to permanently restore it. With a folder open, click the Organize button and select ‘Folder and Search Options’. Move to the View tab and tick the box labelled ‘Always show menus’ before clicking OK.

18 Disable disk indexing (XP)
Unless you regularly use the Find tool to search for files on your computer, Windows XP’s indexing feature will only slow down the PC. To disable it, right-click the hard disk in My Computer and select Properties. Untick the box labelled ‘Allow Indexing Service to index this drive for fast file searching’, then click OK.

19 Trim Start menu searches (Vista)
Vista’s Start menu can be used to perform searches, but the sheer number of files that are searched can mean dozens of results are produced. To get more control over just what is searched for, right-click the Start button and select Properties. On the Start Menu tab, click the Customize button and untick any options that can safely be ignored. We unticked ‘Search favourites and history’, as we don’t often want to look for these.

Then click OK.

20 Quickly lock Windows (XP)
For security purposes, a computer can be quickly locked by pressing the Windows key and L simultaneously. To make this process even quicker, right-click on the desktop, hover the mouse over New and select Shortcut. In the dialogue box that opens, type rundll32.exe user32.dll,LockWorkStation.

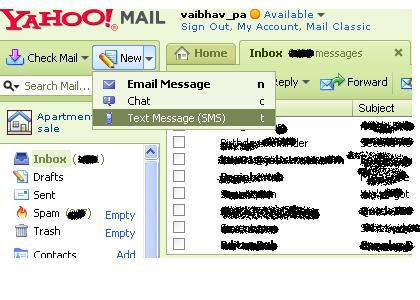
Sending SMS Through Yahoo Mail Free!!

Few days back only i added a free sms sender on this blog and now I just checked and found that Yahoo Mail too has added another feature of sending messages to your Mobile Phone.

Follow the below mentioned steps to send Free SMS using Yahoo Mail.
1. Login to your Yahoo Mail account (Yahoo Mail beta and not the classic one)
2. Click on the New Drop down and select TextMessage.
3. Add the number/contact to which you wish to send the message and click on send.

Its FREE but the catch is that you can only send maximum of 5 sms to a contact after which your contact person needs to reply at least once and then your quota of 5 starts all over again. Although, am not sure of the pricing as far as the reply message is concerned.

This feature is available only for Yahoo users in India,Canada, US and Philippines.

Yahoo mail definitely according to me is going places as compared to Gmail. Lets see who races further ahead in this race of better email service.

Track who is sending you email-Gmail/Yahoo/hotmail

When you receive an email, you receive more than just the message. The email comes with headers that carry important information that can tell where the email was sent from and possibly who sent it. For that, you would need to find the IP address of the sender. The tutorial below can help you find the IP address of the sender. Note that this will not work if the sender uses anonymous proxy servers.

First of all, the IP address is generally found in the headers enclosed beween square brackets, for instance, [129.130.1.1]
Finding IP address in Gmail

1. Log into your Gmail account with your username and password.
2. Open the mail.
3. To display the email headers,
* Click on the inverted triangle beside Reply. Select Show Orginal.
4. manually find the IP address, proceed to 5.
5. Look for Received: from followed by the IP address between square brackets [ ].

Received: from [69.138.30.1] by web4587.mail.***.yahoo.com

6. If you find more than one Received: from patterns, select the last one.
7. Track the IP address of the sender

Finding IP address in Yahoo! Mail


1. Log into your Yahoo! mail with your username and password.
2. Click on Inbox or whichever folder you have stored your mail.
3. Open the mail.
4. If you do not see the headers above the mail message, your headers are not displayed. To display the headers,
* Click on Options on the top-right corner
* In the Mail Options page, click on General Preferences
* Scroll down to Messages where you have the Headers option
* Make sure that Show all headers on incoming messages is selected
* Click on the Save button
* Go back to the mails and open that mail
5. You should see similar headers like this:

Or if you want to manually find the IP address, proceed to 7.
7. Look for Received: from followed by the IP address between square brackets [ ]. Here, it is 202.65.138.109.
That is be the IP address of the sender.
If there are many instances of Received: from with the IP address, select the IP address in the last pattern. If there are no instances of Received: from with the IP address, select the first IP address in X-Originating-IP.
8. Track the IP address of the sender

Finding IP address in Hotmail

1. Log into your Hotmail account with your username and password.
2. Click on the Mail tab on the top.
3. Open the mail.
4. If you do not see the headers above the mail message, your headers are not displayed. To display the headers,
* Click on Options on the top-right corner
* In the Mail Options page, click on Mail Display Settings
* In Message Headers, make sure Advanced option is checked
* Click on Ok button
* Go back to the mails and open that mail
5. You should see the email headers now.
6. manually find the IP address, proceed to 7.
7. If you find a header with X-Originating-IP: followed by an IP address, that is the sender's IP address

Hotmail headers


In this case the IP address of the sender is [68.34.60.59]. Jump to step 9.
8. If you find a header with Received: from followed by a Gmail proxy like this


Hotmail headers

Look for Received: from followed by IP address within square brackets[
In this case, the IP address of the sender is [69.140.7.58]. Jump to step 9.
9. Or else if you have headers like this

Hotmail headers

Look for Received: from followed by IP address within square brackets[].
In this case, the IP address of the sender is [61.83.145.129] (Spam mail). Jump to step 9.
10. * If you have multiple Received: from headers, eliminate the ones that have proxy.anyknownserver.com.
11. Track the IP address of the sender

50 Windows Tips & Tricks-1

For most people using a computer means using Windows and over the years Microsoft’s operating system has become easier to use.

However, there is always room for improvement, so in this feature we have compiled 50 of the finest tips for Windows XP and Vista. These can help to make Windows even better, easier to use and faster. Most don’t even require you to install any extra software, so if you want to make your copy of XP or Vista better, it’s possible to get started immediately.

1 Access My Documents from the Taskbar (XP and Vista)
Right-click an empty section of the Taskbar and select toolbars, then New Toolbar. Navigate to the My Documents (XP) or Documents (Vista) folder and click the OK or Select Folder button. In its default position to the far right of the Taskbar, the toolbar provides menu access to the entire contents of the folder.

2 Extra speed with Readyboost (Vista)
Plugging in a USB memory key is one of the easiest ways to speed up Vista. When the Autoplay menu appears, select ‘Speed up my system’, or right-click the drive in Computer and select Properties. Move to the Readyboost tab, tick ‘Use this device’ and use the slider to choose how much space should be given up. Not all USB memory keys are fast enough to provide this boost.

3 Save folders after a crash (XP)
If you have lots of folders open in Windows XP, when one of them crashes, they will all close. This can be avoided by using a hidden option. Open the Control Panel, then choose Folder Options. Move to the View tab and scroll down through the list of options until you get to one called ‘Launch folder windows in a separate process’. Place a tick next to it, then click OK.

4 Disable Aero Glass (Vista)
Vista’s Aero Glass transparency effects may look great, but they also drain a computer’s processing power. To speed up a struggling computer, right-click the desktop and select Personalize. Click the link ‘Window Color and Appearance’ at the top of the screen and untick the ‘Enable transparency’ box before clicking OK.

5 Save memory (XP)
When you run programs, Windows XP stores files known as DLLs in memory. When you close the programs, it usually leaves them there for later use but this can slow down the computer. If you are fine editing the Windows Registry, this can be fixed – but make suitable backups first and take great care. Click Start, then Run, type regedit and press Enter.

Click the plus sign next to HKEY_LOCAL_MACHINE, then SOFTWARE, then Microsoft, Windows, and Current Version. Select the Explorer folder. Click Edit, then New, then DWORD Value. Name the new entry AlwaysUnloadDll, press Enter, then double-click the item and assign it a value of 1. From now, DLL files will be removed from memory when programs are closed.

6 Partition a hard disk (Vista)
Vista makes it possible to divide a hard disk into two or more partitions that Windows sees as separate disks. Click Start, right-click Computer and select the Manage option. Select Disk Management from the left-hand pane, right-click the disk that is to be split and select Shrink Volume. Enter a new size for the partition and click Shrink.

Now right-click the drive space marked as Unallocated and select New Simple Volume. Follow the wizard to create and format the new partition.

7 Make room for Start menu favourites (XP)
The Start menu includes space for six shortcuts to the most frequently used programs, but this can be increased if it is not enough. Right-click the Start button, select Properties and click the Customize button. In the Programs section in the centre of the dialogue box, use the up arrow button to increase the number of icons that should be displayed and then click OK.

8 Restore a deleted Recycle Bin (Vista)
If you right-click the Recycle Bin, there’s a Delete option – this makes it easy to accidentally remove the bin from your desktop. To get it back, right-click the desktop, select Personalize and then click ‘Change desktop icons’. Tick the box next to the Recycle Bin option and click OK – it will reappear on the desktop.

9 Automatically log in to Windows XP
If your PC has only a single user account, it might seem silly to type in a password every time you start it up. To avoid this, click Start, then Run, and type control userpasswords2 before pressing Enter. Select your account and untick the box labelled ‘Users must enter a user name and password to use this computer’. Click OK, enter the password when prompted and click OK again.