Search this blog

Thursday, April 10, 2008

Disabling Recent Files in Office 2007

By default, Word 2007 displays the last 17 documents that have been opened. Some users, like me, likes to increase this limit, but some use to reduce this limit to 0 and making the recent documents disabled. The number of recent can be increased or decreased, from 0 to 50. Disabling the number of recent documents in Word 2007 wont reduce the number of recent documents in Excel or PowerPoint. You need to go in every application to change this setting.


Follow these steps to perform the same.

  1. Click On Office Button.
  2. Go to Word Options.
  3. Go to the Advanced tab, and look for Display section.
  4. Look for "Show this number of Recent Documents" and fill your desired value from 0 to 50.

Click OK, and you are done with it.

Minimizing the Office 2007 Ribbon

For those of you who are working with low resolution of 1024X768, or below, you must have felt the need of more space while using office 2007. When I work in my college with same resolution, I always want to get more space, specially while using Powerpoint. Now, some more space can be added by minimizing the ribbon, and thus hiding all the buttons which are expanded. This came to me accidentally when I double click on the ribbon, and the ribbon minimized. (These kind of accidents are good )


This can be minimized either by double click on the tabs names, or right click on then and then choose "Minimize the Ribbon". After the ribbon is minimized, to access the options in each tab, single click them, and after the work is done, it auto hides. Double click it back, and you will see the expanded tabs once again.

Do try this simple trick, if you face space problem.

Fasten BroadBand using Firefox

Firefox users already access internet at much faster as what Internet explorer will help you do that. Now there is a way to increase the speed at which you are accessing internet in Firefox only.
HOW?? Lets find that out.

  1. Open Firefox and in the Address Bar type in “about:config”, without Quotes
  2. In the filter box type in Network, and scroll down to find “Network.HTTP.Pipelining”.
  3. Change the value to “True” by double clicking on that.
  4. Also just below that “Network.HTTP.pipelining.maxrequests”, change its value from 4 to 10
  5. Fasten Brodband using Firefox

  6. Click OK, and quit Firefox, reopen it and you would be able to see the difference

If you are using windows 98, then you might need to restart the computer for the changes to take effect.

Change the Default folder in Windows Explorer

Whenever you open Windows Explorer you would see it opening in My Documents, and you need to go all the way to your folder. If you want to get the folder of your choice at the very start of Explorer, then you just need to make some changes in its properties. Here’s what you need to do.

  1. Go to Start –> Programs –> Accessories –> Right Click on Windows Explorer and choose Properties.
  2. Go to the Shortcut tab and then into the target, add the line ” /n, /e, /select, C:\”, without Quotes, Now your target should look like this.
  1. Instead of “C:\” you can type the path of your folder and whenever you will open Explorer, it will come up with your Folder.
Now, If you are using Pre Windows XP, then you can access Windows Explorer by Shortcut “Windows Logo + E”, but in case of Windows XP this shortcut is already defined to give you the explorer window with selection as My Computer. In Xp you need to open it by going into start menu, or you can create a shortcut as well.

Installing Windows in Unattended Mode

Formating your System and Reinstalling Windows is a pretty boring and long work. Now how to make it working. You can format your Hard Drive in a matter of minutes but Installation of Windows is long and boring, Especially when you have to sit in front of computer as setup is running and a window comes up, asking for the information.
Well to overcome this a method called Unattended Installation was provided by Microsoft as in case to get rid of it.
Now, How to do this Unattended Installation?
Here is the solution, Lets see it How.

Follow these steps before Formating your computer or onto another computer.


  1. Insert your Windows Xp/2K3 disk into your computer and open the CD drive.
  2. Open the Support folder, then tools. And then open the deploy(archive) file, you might need Winzip to open that file.
  3. Now in that folder, run file “setupmgr.exe”. It will display Wizard.
  4. Click next and select “Create New”. Select “unattended installation”, click next, then select the OS, click next. Select “fully automated”, click next.
  5. After that wizard will now ask you all the questions that are asked by setup during installation.
Unattended Installation
  1. In floppy disk you should see 2 files, winnt.sif and winnt.bat, if not go through the whole process again.
  2. Your Files are now ready1. When you will start the installation it will automatically take all the files from the file. Now you can install Windows Xp/2k3 into any computer.

So, next time you Install Windows, Do use this to save your time.


Does Your Drive Not Open on Double Click

One of our readers Manish mailed me and asked a question. “Whenever I double click on my D drive, it does not open. It shows me a find window and i am not able to access it. I am not able to access any type of data, What can be done.
On Further probing, I came to know that whenever he double clicks, Find window opens up, and this was no result of a Virus attack, it was just playing with the Folder Options, which resulted in this situation.
He was able to see the “Find” option as the main option in bold, and also able to open drives through right click options. When I checked it, I saw that the Registry gets edited when we do the changes as Manish did.
Here is the solution to Manish’s Problem

  1. Go to Start –> Run, Type Regedit
  2. Go to HKEY_LOCAL_MACHINE\SOFTWARE\Classes\Drive\shell
  3. In the Right pane, Change the Only value there “Default” to “None
This Solved the issue. If you are facing this problem too, you can try this and thus get your problem solved.

Open Explorer to the Directory you want

If you want to create a shortcut that will open the desired folder in explorer, then here is a small trick for you all. Just by including the path, this can be achieved.

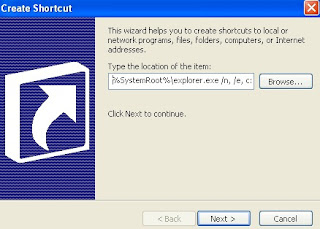
  1. Right click on Desktop, and go to New –> Shortcut
  2. On the shortcut location type in “%SystemRoot%\explorer.exe /n, /e, C:/TechiesDen
  1. Here C:/TechiesDen is the destination folder, you can type in your folder path name here.
Hope you enjoyed it :) .