Search this blog

Thursday, March 20, 2008

Select Details You Want To Display In Folder

Whenever you select Details as the view for your folder, you can actually select the details you want to see in that folder. This can be done on single folders as well. You can select from large range of options and can also select the size of the column. To add/remove items in that view just follow these steps.


  1. Open your Folder, and select view as Details.
  2. Go to View –> Choose Details.
  3. Select the options you want to see.
  4. Right click on the options to see what details they provide.
  5. You can also move the details up and down according to your needs.
  6. At bottom you can choose the width of the column in pixels.
  7. When done click Apply, Ok.
You will now be able to see more options and the options of your choice.

Hide “Folder Options” in Xp

It can be done with a simple change in groups policy settings. Last post I made was specifically in case you are hit by a virus, But this is a usual way, and a much better way to hide the Folder Options in your Computer. This is how it can be performed, by groups policy.

  1. Go to Start –> Run, Type “gpedit.msc.
  2. You will see a Group Policy Editor.
  3. Go to User Configuration –> Administrative Templates –> Windows Components –> Windows Explorer.
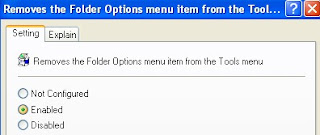
  4. Now click Windows Explorer, and on the right pane, look for option “Removes the Folder Options menu item from the Tools menu“
  5. Double Click it and Click Enable, this will enable this service, and “Folder Options will no longer be visible.


In case you want it back, you can “Disable” it, or click “Not Configured“.

Customized Icons for Drives

Bored of your plain and uninterestingly looking icons of your drive? How can you make a private by just looking at it. Well, one of the ways is to give the drives your name. Another way is to give it a customized icon, or even your photo. Now, how is that possible? Here is easy tweak that will take you through the process of placing these icons for your drive. This same tweak will work for Flash drives, and Disks. Here are the steps you need to follow.

  1. Choose any image and convert it into an “ICO” file.
  2. Download this new “ICO” file and place it in the drive you want to assign this image to.
  3. Now, open notepad, and type the following commands

    [autorun]
    ICON=filename.ico

  4. Save this file as autorun.inf, and make this file and image as hidden.
  5. You can hide this file by going into properties, and then selecting the Hidden box.
  6. Reboot your computer and you will see the new icons into effect.

Minimizing the Office 2007 Ribbon

For those of you who are working with low resolution of 1024X768, or below, you must have felt the need of more space while using office 2007. When I work in my college with same resolution, I always want to get more space, specially while using Powerpoint. Now, some more space can be added by minimizing the ribbon, and thus hiding all the buttons which are expanded. This came to me accidentally when I double click on the ribbon, and the ribbon minimized. (These kind of accidents are good )


This can be minimized either by double click on the tabs names, or right click on then and then choose “Minimize the Ribbon“. After the ribbon is minimized, to access the options in each tab, single click them, and after the work is done, it auto hides. Double click it back, and you will see the expanded tabs once again.
Do try this simple trick, if you face space problem.

Changing Internet Explorer Title

I posted on how to change the Internet Explorer title. However, some of our readers were facing problems in changing it in IE 7 and in Vista as well. This can be done via Group Policy editor as well, making it sure that the title name is as desired.
Follow these steps to attain desired result.

  • Go to Start –> Run, Type “msconfig.msc“
  • Go to User Configuration –> Windows Settings –> Internet Explorer Maintenance –> Browser User Interface.
  • Select it and On right pane, look for “Browser Title“
  • Double click it, Check the box “Customize Title Bars“, and Type in whatever you want to
  • Click Apply and Its done

“Show Hidden Files and Folders” not Working ???

One of our readers, says that he is able to find “Show hidden files and folders“, but when applied, it doesn’t work, and apart from that, it gets back to “Do not show hidden files and folders” when reopened and checked.

Here is solution to that problem

  1. Go to Start –> Run, type Regedit
  2. Go to HKEY_LOCAL_MACHINE\SOFTWARE\Microsoft\Windows\CurrentVersion\Explorer\Advanced\Folder\Hidden\SHOWALL
  3. In the right pane, look for key “CheckedValue” and change the value to “1“
  4. Also look for key that says “DefaultValue” and change its value to “2“


Creating Handouts of your Presentations

Presentations are a daily thing for all students, and it is same for me as well. Submitting these Presentations in Soft form is fine, but when it comes to hard copy, its really not feasible to take prints of each and every slide and then submit. A better way is to provide the Handouts for these presentations i.e. having multiple slides on each sheet, further saving on paper and ink :).

Here’s how can take the printouts for PPT’s.

  1. Open Powerpoint, and click on the View tab
  2. In view tab, click on Handout Master
  3. Select the number of slides you want to print on each paper, and decide on the number. 4 or 6 is the most appropriate number according to the type of presentations you have
  4. Now click on Print, and print the Slides
  5. Please See that you might be required to set up Handout type in Print properties as well. Some printers do not accept command from Powerpoint, else in that case, you need to setup through the print properties page, which also allows you to change the number of slides per page.
Please Consider the Environment before taking any prints, its surely helps nature in some way.